Alt-F4 #23 - Beltravaganza 12-02-2021
After a hiatus of two weeks due to a couple of FFF’s hot off the presses, we’re back this week with two articles all about belts. In the first one, Recon419A explores an interesting concept that has belts deliver items in a just-in-time fashion. Then, things get truly nerdy as pocarski takes a deep dive into building a turing machine only using belts. Computer Science degree recommended!
Logistics Belts Recon419A
Factorio has three main methods of moving items: belts, bots, and trains. Belts are good for single- or double-item throughput, trains for massive quantities of a single item, and bots for complicated crafting tasks. Sometimes, however, you need a combination of these approaches, which is where techniques like sushi belts can come into play. In this article, I want to talk about another approach I call “logistics belts”. Like sushi belts, logistics belts can be used with or without mods and are not a mod themselves; rather, they are a way to control what resources go where using belts and very simple circuits. Like the vanilla logistics network and certain train-based mods like LTN, they aim to be a way to deliver resources that’s smarter than simply running basic belts.
Description of a Logistics Belt
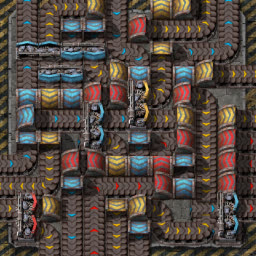
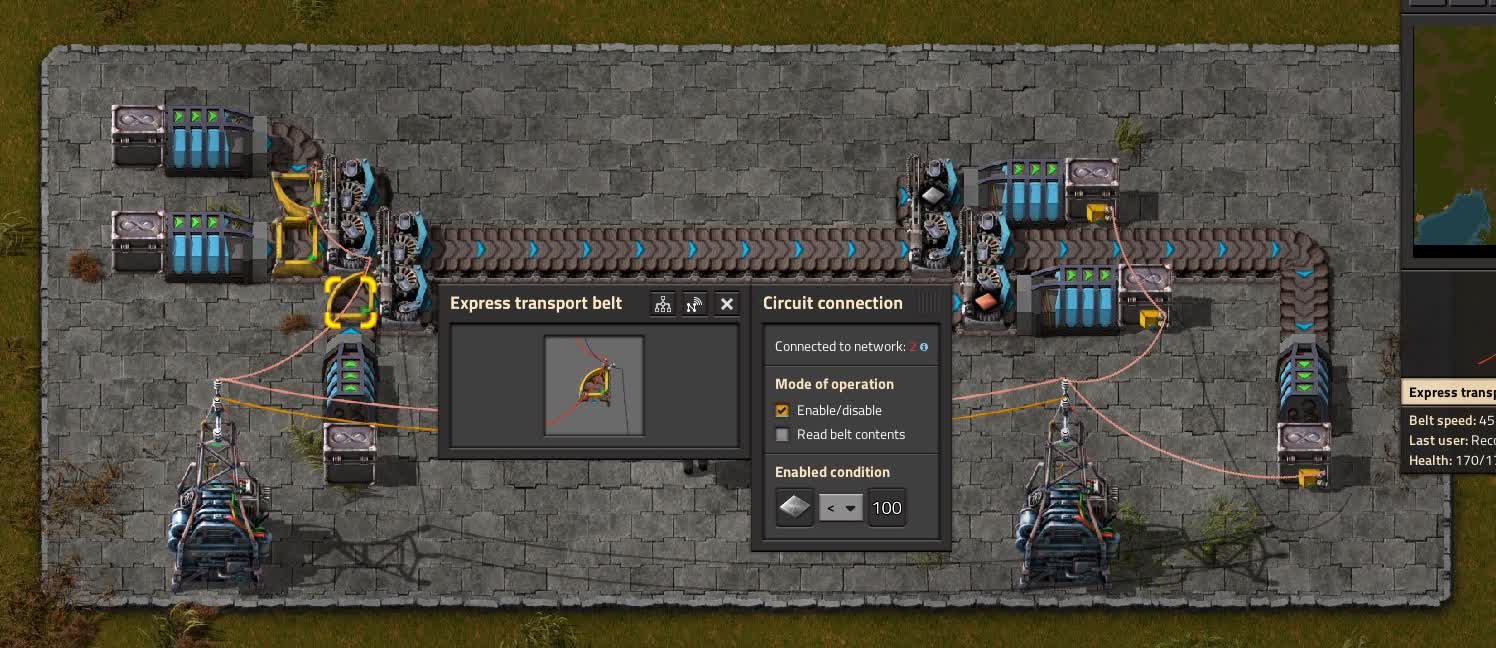
Logistics belts are a somewhat complicated concept, but it’s much simpler to understand when you see one in action. In this example, pay attention to how several items are sent along the same belt, each being loaded onto the belt only when requested. If iron and copper is all that is needed, no steel will be sent; likewise, if nothing is needed, the belt will remain empty.
You can see in the example that the circuit condition is set to send materials when the destination has less than one hundred. In reality, the length of the belt will affect how many materials are sent; if the belt is long, one hundred will be buffered with hundreds still on the belt. There is a theoretical limit to how long the belt can be without overflowing the receiver chest, but in practice, you won’t hit it if you’re using steel chests; at very large distances, you’ll be using trains instead anyways. If you would like to have a play with this logistics belt setup, the blueprint string is available here, though it should be noted the blueprints utilizes loaders from the Loader Redux mod.
Use Cases for Logistics belts
Logistics belts are useful when you need a lot of an item all at once, and then none of it for a very long time. Anyone who has ever automated belts with bots will be familiar with the phenomenon known as the “charging cloud” that comes about when your logistics network asks for no less than ten thousand gears and fifteen hundred electronic circuits. Likewise, when you ask for something like the materials to make a nuclear reactor or a rocket silo, bots will tend to swarm around an assembler in an area that was never designed for that degree of throughput. When you need a lot of an item, it’s much easier to get it in by belt: sending ten thousand gears takes less than four minutes and barely damages your UPS; with bots it would take 2500 separate trips and likely make that many bots go airborne, swamping charging capacity that may never have been designed for that and taking forever to return to equilibrium. Running dedicated belts for every item, however, creates its own set of problems; often, the belts will be sitting idle and taking up space within your factory, and you may not even have room to run an eight-bus in the first place. For something like your belt mall, sending a large load of gears intermixed with a large load of electronic circuits is trivial for a logistics belt; once they arrive in that location, using bots internally is much less strain on your logistics network.
Limitation: Multiple Destinations
The problem of sending one item to multiple destinations is non-trivial, and it’s something I personally haven’t been able to solve. Because filter splitters pull all of an item off, sending that item past a filter splitter some of the time only requires complicated splitter arrangements and several circuit conditions originating from different destinations. I’ve given the problem a good deal of thought, and while I’ve come up with several prototypes, they’ve mostly been prone to behaviours like jamming or sending too many of an item to the wrong destination, potentially causing an overflow if left unattended. With the Factorio community being what it is, I wouldn’t be surprised if this is solved within a week or two, and in several different ways; maybe we’ll even hear about your solution in a future Alt-F4. For now, though, I leave it as a challenge to the community. Be sure to let me know what you come up with!
A Note on Sushi Belts
Players who have been around the game a while may have already encountered a similar concept: sushi belts. Like logistics belts, sushi belts place more than two resources on a belt, but they generally do so as a loop designed for complicated crafting. A circuit condition at the entrance or around the entire belt helps to control the amount of every resource present, even leading to such complicated examples as the “bloodbus” - a circulatory system for your factory. While the concept of a logistics belt is similar, it has a few important differences, and the key one is related to their function: while sushi belts go around, and tend to service multiple assemblers in no particular order, logistics belts go to and tend to direct resources from one location to another. In fact, a logistics belt can be used to feed a sushi belt in place of an ordinary bus - when resources are needed, they can be sent, with carefully limited rate control preventing over-population of the belt loop. Other concepts like clocked belts or inserter limiting can be applied here, and can even be combined with logistics belts to achieve monumental feats of engineering. In my mind, logistics belts themselves are just one part of the player’s toolkit.
Belt-only Computing, Part 1: Not-so-quick Maths pocarski
In Factorio, we can use the circuit network to build systems, starting with some simple boolean logic, up to a fully functional computer and then, someone insane enough might even run DOOM on it. What is less obvious, however, is the fact that the circuit network is not the only Turing complete (have a look at the linked page if you’re unfamiliar) system in the game. Indeed, you can build a computer out of something very basic, something which you get almost as soon as you start a new game: belts.
In this two-part series, I will be walking through the process of designing two systems used in real-life computers with nothing but belts and splitters. I will be using loaders and infinity chests, however at any time there are exactly as many items entering as there are items leaving, so all belts could also be looped through a buffer. I chose not to do that for the sake of compactness and avoiding spaghetti. I have to give credit to letao12 who made a series of videos around creating a belt-only CPU, which is what inspired me to come back to his idea with my own take on it.
For any system to be Turing complete, it must be possible to create something known as logic gates. Logic gates are simple elements that perform basic operations of Boolean algebra by giving an output based only on the current inputs. There are only 2 numbers in Boolean algebra: 1 and 0. In electronics, they correspond to high voltage and low voltage but, in our case, we will say that a belt with items is a 1, and an empty belt is 0. There are 3 basic logic gates:
- OR gate - outputs 1 if at least one input is 1
- AND gate - outputs 1 if all inputs are 1
- NOT gate - outputs 1 only if the input is 0
The truth table below shows their respective outputs based on the range of possible inputs.
| A | B | NOT A | A OR B | A AND B |
|---|---|---|---|---|
| 0 | 0 | 1 | 0 | 0 |
| 0 | 1 | 1 | 1 | 0 |
| 1 | 0 | 0 | 1 | 0 |
| 1 | 1 | 0 | 1 | 1 |
It is a known fact that by chaining these logic gates in specific ways (and sometimes looping some wires), it is possible to construct a Turing machine. All three of the basic gate types can be created entirely with belts and splitters. Here a link to a blueprint book with everything from this article, for anyone who would like to experiment with the circuits themselves. I will refer to different items as “item type 1/2/3/…”, for convenience and generality, and priority/non-priority inputs and outputs as “primary/secondary”, mostly just for convenience. I will also be using different colours in the images, to differentiate between item types.
The basic gates
The AND and OR gates are as simple as a single splitter with a set priority:
The NOT gate is a bit trickier to make, but it can be done by using more than one item type and some clever filtering and prioritizing:
Whilst input A is 0, the first splitter is only receiving one input, and so item type 2 is going onto the primary output, meaning only the NOT A output is 1. When input A is on, the first splitter is now getting 2 inputs; item type 1 is going into the primary input, therefore it gets put on the primary output, replacing item type 2 which is now coming out of the secondary output. The secondary output is effectively a copy of A, but with a different item type.
The primary output of the first splitter is always 1 but switches item type depending on the input. Using a filter splitter, we can split this variable item type signal into 2 wires: one will just be signal A coming straight through with the same item type as the original input, type 1, the other will be NOT A, with item type 2.
This second circuit is exceptionally useful because it combines a NOT gate, a signal duplicator, and an item swapper. We need signal duplicators because branching a belt with a splitter makes the item flow unsaturated, which causes it to interact with other splitters incorrectly as it is neither 0 or 1. We also need item swappers as there is often a mismatch between one circuit’s output type and another’s input type.
The half-adder
Now that we have our 3 basic components, let’s build a half-adder. Why would we need a half-adder? Well, as the name might suggest, a half-adder is one half of a full adder, which is a circuit with the ability to add binary numbers together. This will allow us to do addition, and creative uses of addition allow us to implement literally every other mathematical operation imaginable.
A half-adder is a circuit that sums two single-digit binary numbers. This may sound like a daunting task, but in reality, it’s very simple. Both inputs A and B are single-digit binary numbers, meaning the maximum possible output is 2 (1+1), which, unfortunately, will not fit into a single-digit output. Instead, we will use a two-digit binary number where the first digit has a place value of 2 (21) and the second a place value of 1 (20). Taking this into account, here is the half adder’s truth table:
| A | B | First digit of A + B | Second digit of A + B |
|---|---|---|---|
| 0 | 0 | 0 | 0 |
| 0 | 1 | 0 | 1 |
| 1 | 0 | 0 | 1 |
| 1 | 1 | 1 | 0 |
We can see that the first digit is simply A AND B. However, for the second digit, we need something called an XOR gate (XOR stands for “exclusive OR”). An XOR gate outputs 1 if exactly one input is 1, which is precisely what we need for the second digit.
An XOR gate’s logic is, “A or B, but not both”, and therefore an XOR gate is just (A OR B) AND NOT (A AND B). Here is how to do this with the basic gates discussed earlier:
Notice that we also get the AND gate output for free thanks to the combined duplicator-NOT circuit, giving us a complete half-adder. It just so happens that we can combine the first item swapper with the second AND gate, which allows us to get rid of a splitter:
The final product
Now, to convert our half-adder to a full adder, we need to connect 2 of them in sequence (hence the name “half-adder”):
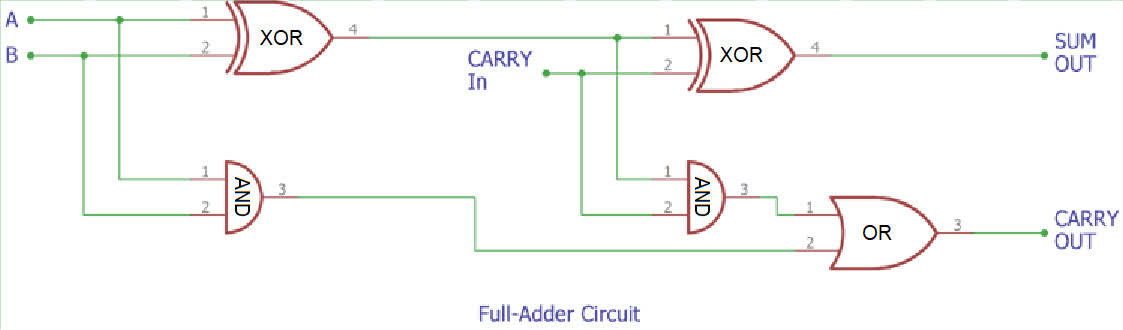
As you can see, a full adder is just 2 half-adders chained in a specific way. Now, we could just copy and paste the circuit, but thanks to the properties of belts, there is a much better and smaller way. The 2 lanes of a belt are processed by splitters independently from each other, meaning that instead of chaining two half-adders, we can instead run everything through a single half-adder twice. This is usually impossible with traditional logic circuits, but in this brave new world of Factorio computers, anything goes. Here is how:
Here, the first half-adder uses the right-hand side of the belt, and the second half-adder uses the left-hand side of the belt. First, the inputs make it through the first half-adder as normal on the right-hand side of the belt. Next, the half adder’s XOR output is looped all the way back and is now put on the left side of the belt. It goes through the same mechanisms again, but since it’s on the left side, it doesn’t interact with the right side at all. The second half-adder still has a free input, though, so we have to connect a third input belt, this time on the left side to act as the carry in bit. The AND outputs of both half-adders are sideloaded onto a belt, automatically creating an OR. Internal delays might cause both half-adders’ carries to output at the same time, causing it to attempt to unload a full belt onto half of a belt. Therefore, we also need an overflow protection splitter so that the carry bit doesn’t back up and break the entire circuit. After some rearranging of the components, we get this:
This is exactly the same circuit as in the previous image, and I leave it as an exercise to the reader to verify that. The only thing left to do is to stack a bunch of these together and feed them numbers, so here is a belt-only adder calculating 01001101 (77) + 10001011 (139) = 011011000 (216):
Adding numbers is cool and all, but it’s nothing without some kind of memory, which is exactly what we will be exploring in the next issue. Stay tuned!
Contributing
As always, we’re looking for people that want to contribute to Alt-F4, be it by submitting an article or by helping with translation. If you have something interesting in mind that you want to share with the community in a polished way, this is the place to do it. If you’re not too sure about it we’ll gladly help by discussing content ideas and structure questions. If that sounds like something that’s up your alley, join the Discord to get started!