Alt-F4 #15 - Investigating 1.1 2020-11-27
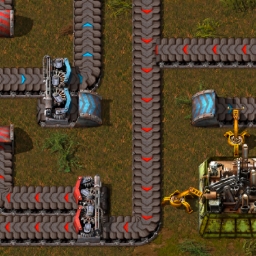
Table of Contents
This week, with 1.1 experimental just released, we take a look at two of the things it brings with it. First, Conor_ investigates what the new train stop limit allows him to do in his TSM-based factory. Then, Therenas explores what the multithreading update to belts means, both in theory and in practice. Careful, you might just learn something!
Train Stop Limits Conor_
When the topic came up of talking about the changes that 1.1 brings, the obvious thing for me to discuss is of course the new train stop limit feature because I love trains! In the following, I’m taking a look at what problem this feature solves, and how I dealt with it before now.
A simple mistake by a younger, naiver Conor_
A while ago now I was building one of my first big bases to try and beat SpaceX on 5x research costs (because Why not?) when I noticed issues arising in my spaghetti™ train network. In my youthful ignorance I had decided that the stops for a given material should share a name, deploying a large number of trains to run between these stops to ensure all of them got used. This was not a good idea. The simple-to-implement system led to pain and suffering, the likes of which I hadn’t experienced since trying to figure out oil processing. It had worked well for me on small bases with only a couple of stops spread over a short distance, but at a large scale trains simply weren’t going to the outposts that were further away. Some stops were backing up and causing deadlocks, whilst others were deserted. I decided there had to be a better solution, and like the good engineer I am, I worked hard to research and develop and better solution to the problem asked Reddit.
Does anyone knows of a mod that will equally distribute trains between stops of the same name, irrelevant of the distance difference. E.g. All iron unload stops called one thing but an equal number of trains go to each of the different stops.
— Conor_ (August, 2019)
What a lovely pipe dream I had there. Instead of what I asked for, I was quite rightly pointed towards TSM and LTN, then told to move along. But with 1.1, the devs shouted down from on high, “We have a new train feature!” Okay devs, you have my attention…
What are Train Stop Limits?
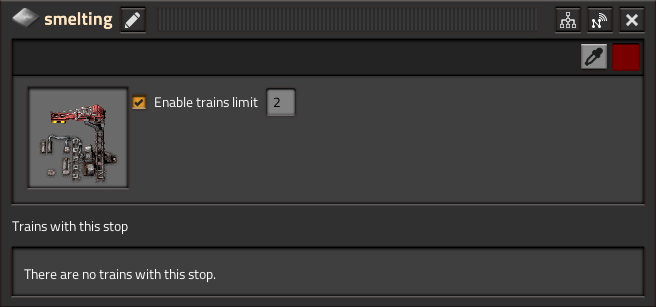
The train stop limit, as discussed in FFF-361, allows you to set a limit on the number of trains at any one stop. The technical details of this system are talked about much more in the FFF (which is definitely worth a read), but essentially a train should only go to a train stop if there is space for it to be received, which is exactly what young Conor_ wanted. But does it hold up in comparison to my new-found love, TSM?
What is TSM and why should I care?
Train Supply Manager (TSM) is a mod which allows train stops to request a train when certain circuit conditions are fulfilled. One pertinent example for such a condition would be to request a train when less than a certain number of trains are en route to the stop. It also allows you to do more complex circuit wizardry such as only requesting a train when there is enough material to actually fill it, though I have never used this functionality.
The dream for TSM is to fully implement a pull-based logistics system rather than the push-based one seen on more basic setups. Pushing is the usual strategy you can find in many smaller factories where trains are filled up at the outpost, then pushed away to queue up at the destination. With a pull system, the trains are always either ready to deliver or ready to be loaded up, and are only requested (i.e. pulled) when resources are needed.
The difference here is where the timing of the trains is decided; for a push-based system, the timing is dictated by how quickly the stops can fill the trains and send them on their way, irrespective of how many resources the factory needs. By switching to a pull system, the timing is decided by the destination stops, allowing them to request trains only when they are actually needed. This allows you to massively reduce the number of moving trains on a given network and control where trains queue up to ensure they do not cause congestion. Though this is also possible in vanilla using large train stackers, carefully planning where waiting trains should stop, it is not very ideal or convenient. In this system, the trains are being requested at both the collection and drop-off stops, which is especially important for larger bases and is the reason I love TSM so much.
Can Train Stop Limits replace TSM?
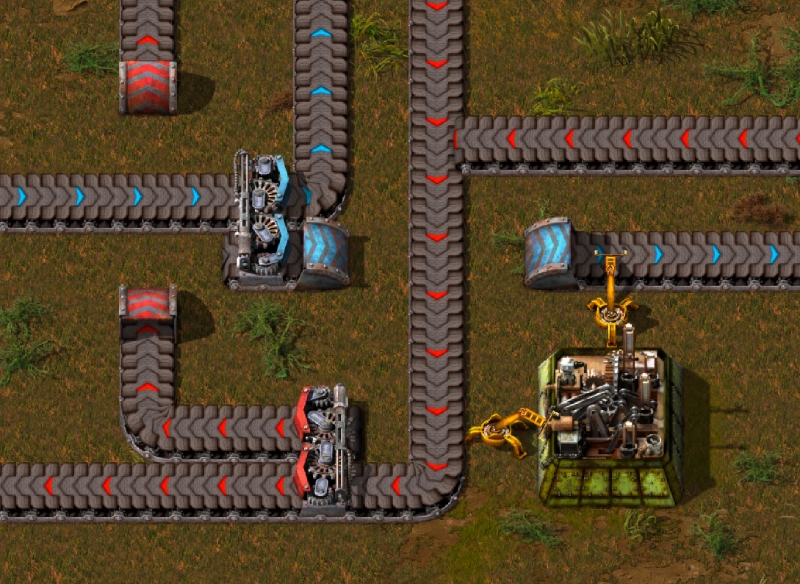
To understand when TSM will be needed versus just using the new train stop limit feature I recreated the TSM setup in vanilla 1.1, without TSM, with great success!
The reason this works so well and is such a good drop-in replacement for TSM is that the trains wait at the depot stop until there is space in the loading or unloading station. If the trains were to wait at the loading spot, this would cause congestion and limit the output capacity of the producer. Using depot stops allows the trains to have a “staging area” of sorts, to wait until they are needed, out of the way of the rest of the train network.
As we can see, the entirety of this system can be recreated with the new vanilla feature, likely with better performance due to the first-party nature. This doesn’t even account for the increased simplicity of the train stop limit compared to understanding TSM, which has quite a steep learning curve and less than perfect documentation. TSM may still be useful in certain scenarios, such as when the player wants information about which requests are currently unfulfilled which TSM provides through its interface, though I personally rarely use these features.
Conclusion
A common occurrence for games with modding support is for the game developers to notice interesting mod functionality and implement it into the base game. This can be a bit painful for the mod creators as it makes their mod mostly obsolete, but in the end, they have succeeded in improving the game. Their mod is now indirectly built into the game they love, meaning more people can use it, which is great.
Special thanks to sorahn in the Factorio Discord server for spotting my questions and going out of their way to help me, making the map which I modified above to help illustrate how TSM can work in the “double request” configuration as well as for sanity checking my ideas before I built them.
This feature will be amazing for newer players (like the young and naive Conor_) to get into building larger and more elaborate train networks, more easily. It provides yet another easy-to-learn, hard-to-master feature for dedicated players to use and explore, whilst helping newbies get in on the fun.
1.1 Performance Improvements Therenas
The most recent experimental version of Factorio brought with it many changes, one of which I want to take a closer look at today. It’s meekly hiding away in the 1.1.0 changelog and hasn’t been mentioned in any editions of FFF preceding the release. It’s just four words: Multithreaded belt update logic. I’m here to find out what that means, and what impact it actually has.
How does this optimization work on a technical level?
Now, you might not have any concept of what it means to multithread game logic. Why not just multithread everything, so the game can take advantage of all the cores your PC has? Well, turns out it’s not that simple. In general, the game needs to update all the machines, belts, pipes, etc, every tick. That’s how time actually progresses in game, allowing you to play in the first place. The order in which this happens is important. First the belts move items in the direction of the belt, then an inserter picks one up and puts it into a machine, then that machine uses it to craft something.
The fundamental problem that multithreading brings is that it can’t make any guarantees about the order in which things happen. When you multithread the previous example, it could be that the machine tries to craft something before the inserter inserts the item. In that case, the machine wouldn’t have been able to craft because it was missing the ingredient. If the insertion happened first, then the craft could go ahead. This is a problem because it is non-deterministic. Depending on how the threaded logic turns out, the machine either crafts an item or it doesn’t, which breaks the whole simulation.
This example is just an illustration of the problem of course. The actual issues that pop up are more complicated and technical in nature. Also, the actions I used as examples naturally don’t all happen in a single tick for a specific machine; they’re an analogy to illustrate the issue at hand. They don’t necessarily correspond to how the game actually organizes things.
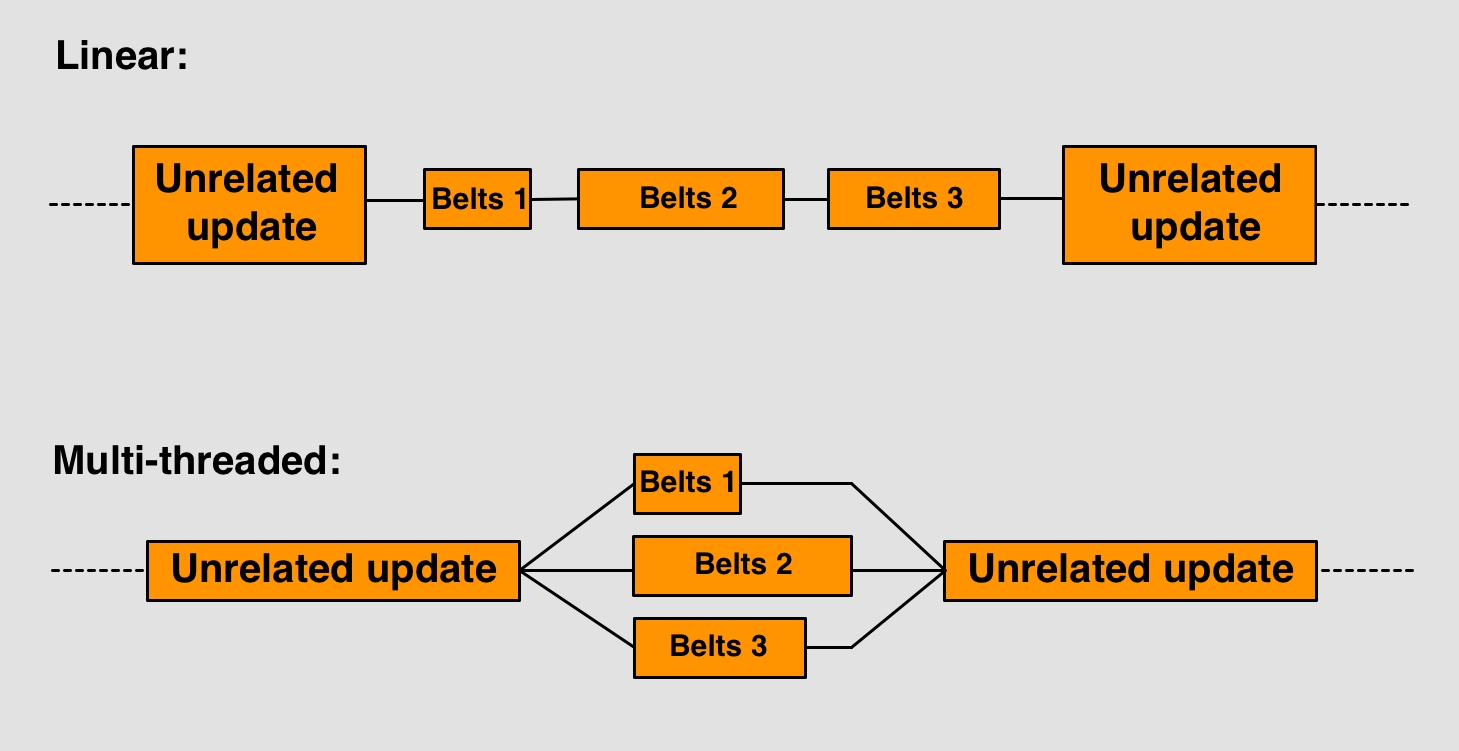
So on the surface, it seems like you can’t multithread anything in a game like Factorio because it would break the simulation. Everything depends on everything, right? Well, not quite. There will indeed always be parts that need to be executed in a strictly linear fashion, but you can find some parts of the whole that are truly independent of each other if you take a closer look. The belt logic is one of those parts.
When you think about it, each belt is not related to every other belt on the map. Sure, there are giant networks of belts that are interconnected, like when running a main bus, but there are also lines of belts that aren’t related to each other at all. Quite a few in fact, as trains or arrays of machines tend to break up lines of belts.
This allows us to parallelise (i.e. multithread) the logic for updating belts. Now, we have to be careful; this doesn’t mean we can just update the belts at any point during the tick. There still needs to be the steps of moving the items, letting the inserter pick it up, having the machine craft an item, in that order. The thing we can do is split up the moving of items. When we get to that point, we split up the task so that every isolated line of belts gets its own thread. Each thread then moves the items on the line of belts it’s been allocated, making it so they all move at the same time, i.e. get processed in parallel. If we are careful to only split up lines of belts that don’t interact with any others, we can safely update them on their own.
This approach is very similar to how the fluid update logic was improved, as discussed in in FFF #271. That blog post has some deep insight into things like how the memory layout was changed to improve cache efficiency, but that’s not the focus of this article. There’s also a very interesting Reddit thread by Varen/Raven talking about the re-implementation of Factorio with multithreading in mind from the start. Give that one a read for additional technical conversation about this topic.
Brass tacks: what’s the real-world difference?
All that theory is nice and all, but you’re wondering what the actual impact on performance is. Well wonder no longer; I’ve brought charts!
As a disclaimer, these measurements were made on version 1.0.0 and 1.1.1 respectively. I used the in-game console to increase the speed of the game, allowing me to achieve UPS of more than 60. The numbers were not measured with highly rigorous methods, which means they have a non-negligible margin of error. What also needs to be considered is that the entity update performance was increased as well according to the patch notes. This is included as well, although I don’t think my measurements are precise enough to draw definitive conclusions.
I benchmarked three different saves with different characteristics, although all of them use a lot of belts. You can’t improve the performance of the non-existent after all. Let’s meet our contestants, all of which are taken from the amazing FactorioBox website, which has a small collection of maps that are useful for benchmarking.
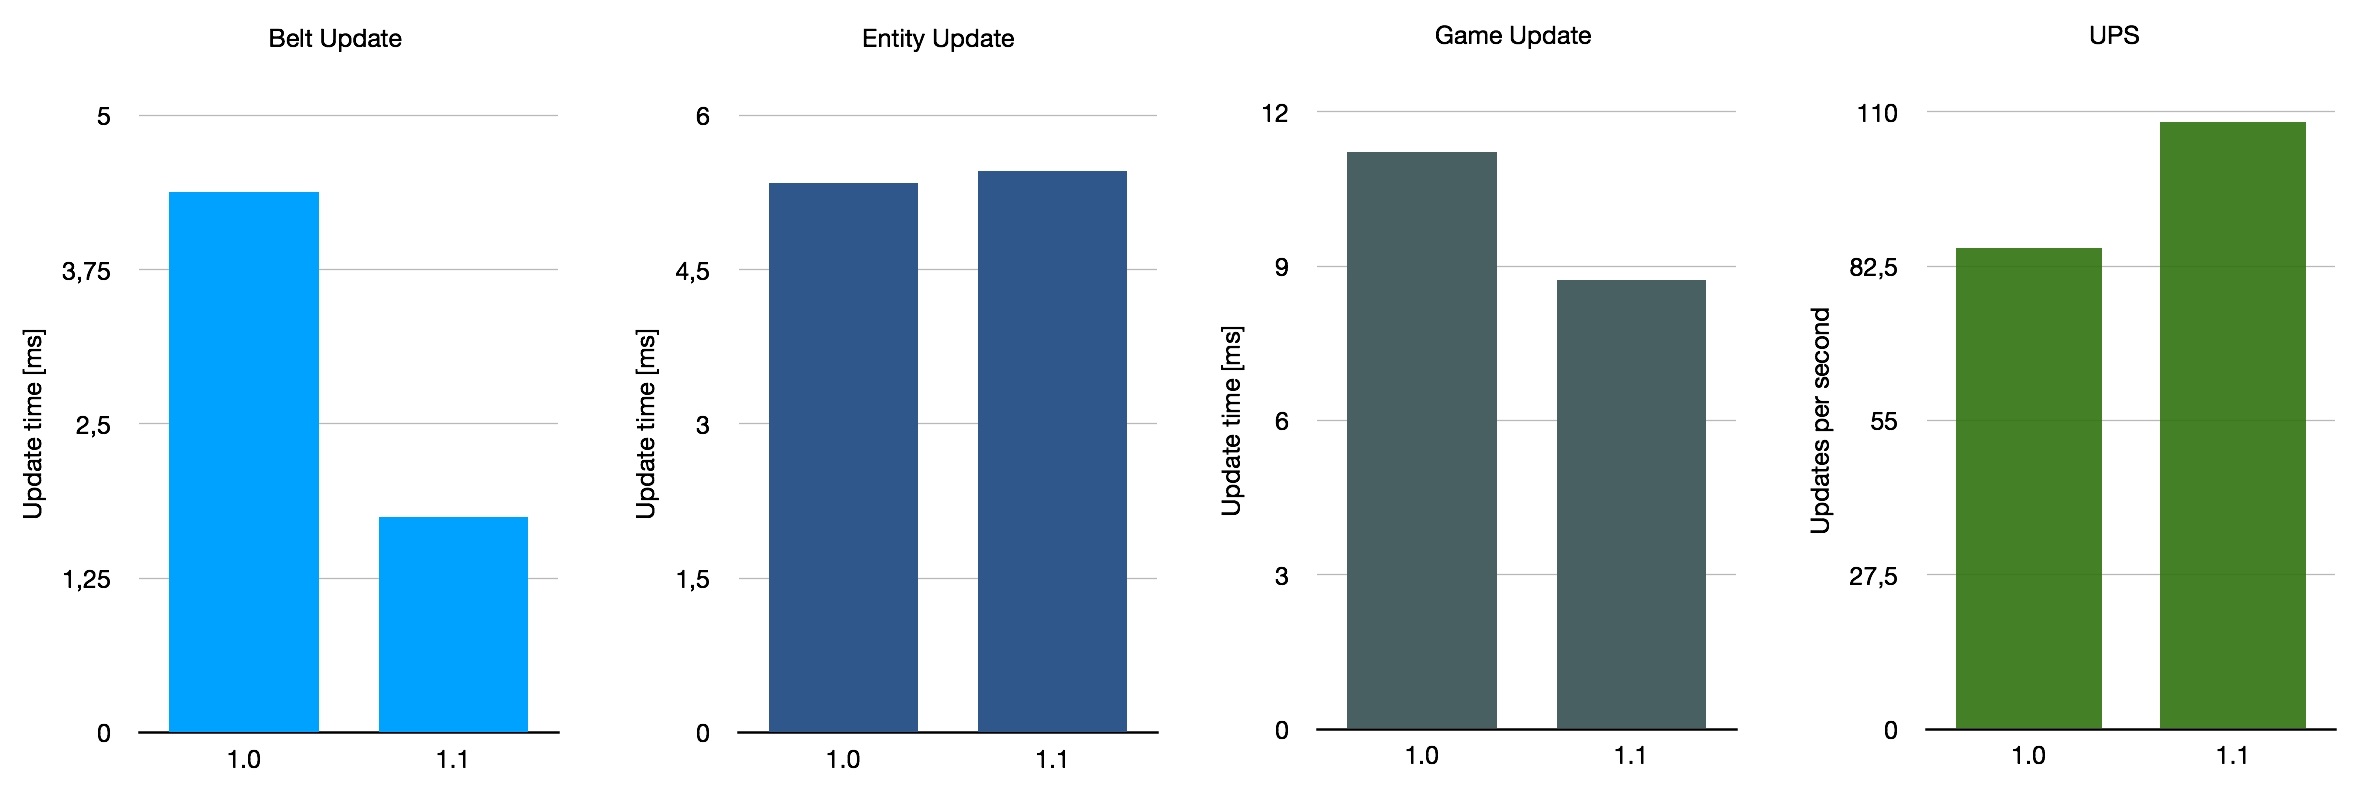
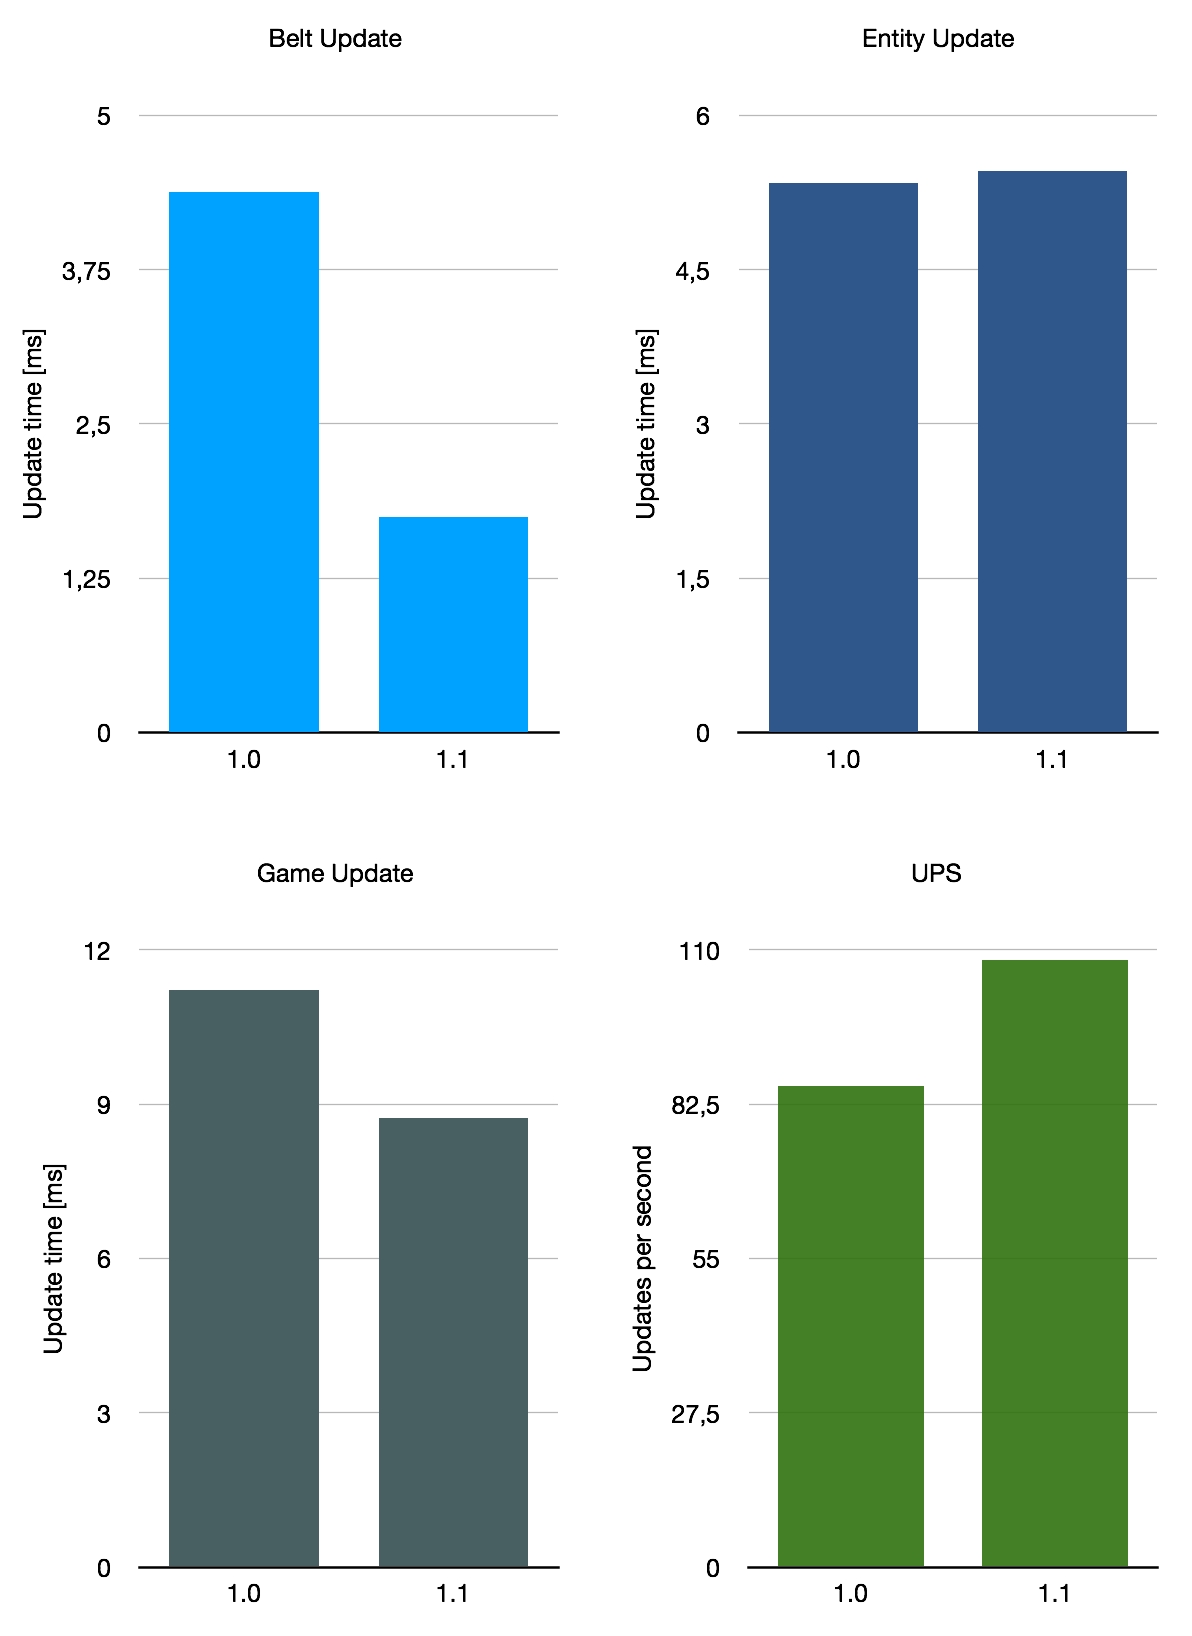
First, I tested the 10k SPM base by Stevetrov. It uses really performance-optimized layouts, relying almost entirely on belts. No trains are in use, with bots only being used very specific circumstances where they prove better for performance than belts. This makes it an ideal candidate to show off the impact that this change can have. The effect won’t be as pronounced in other cases as the performance costs get spread around more to other things like trains or bots.
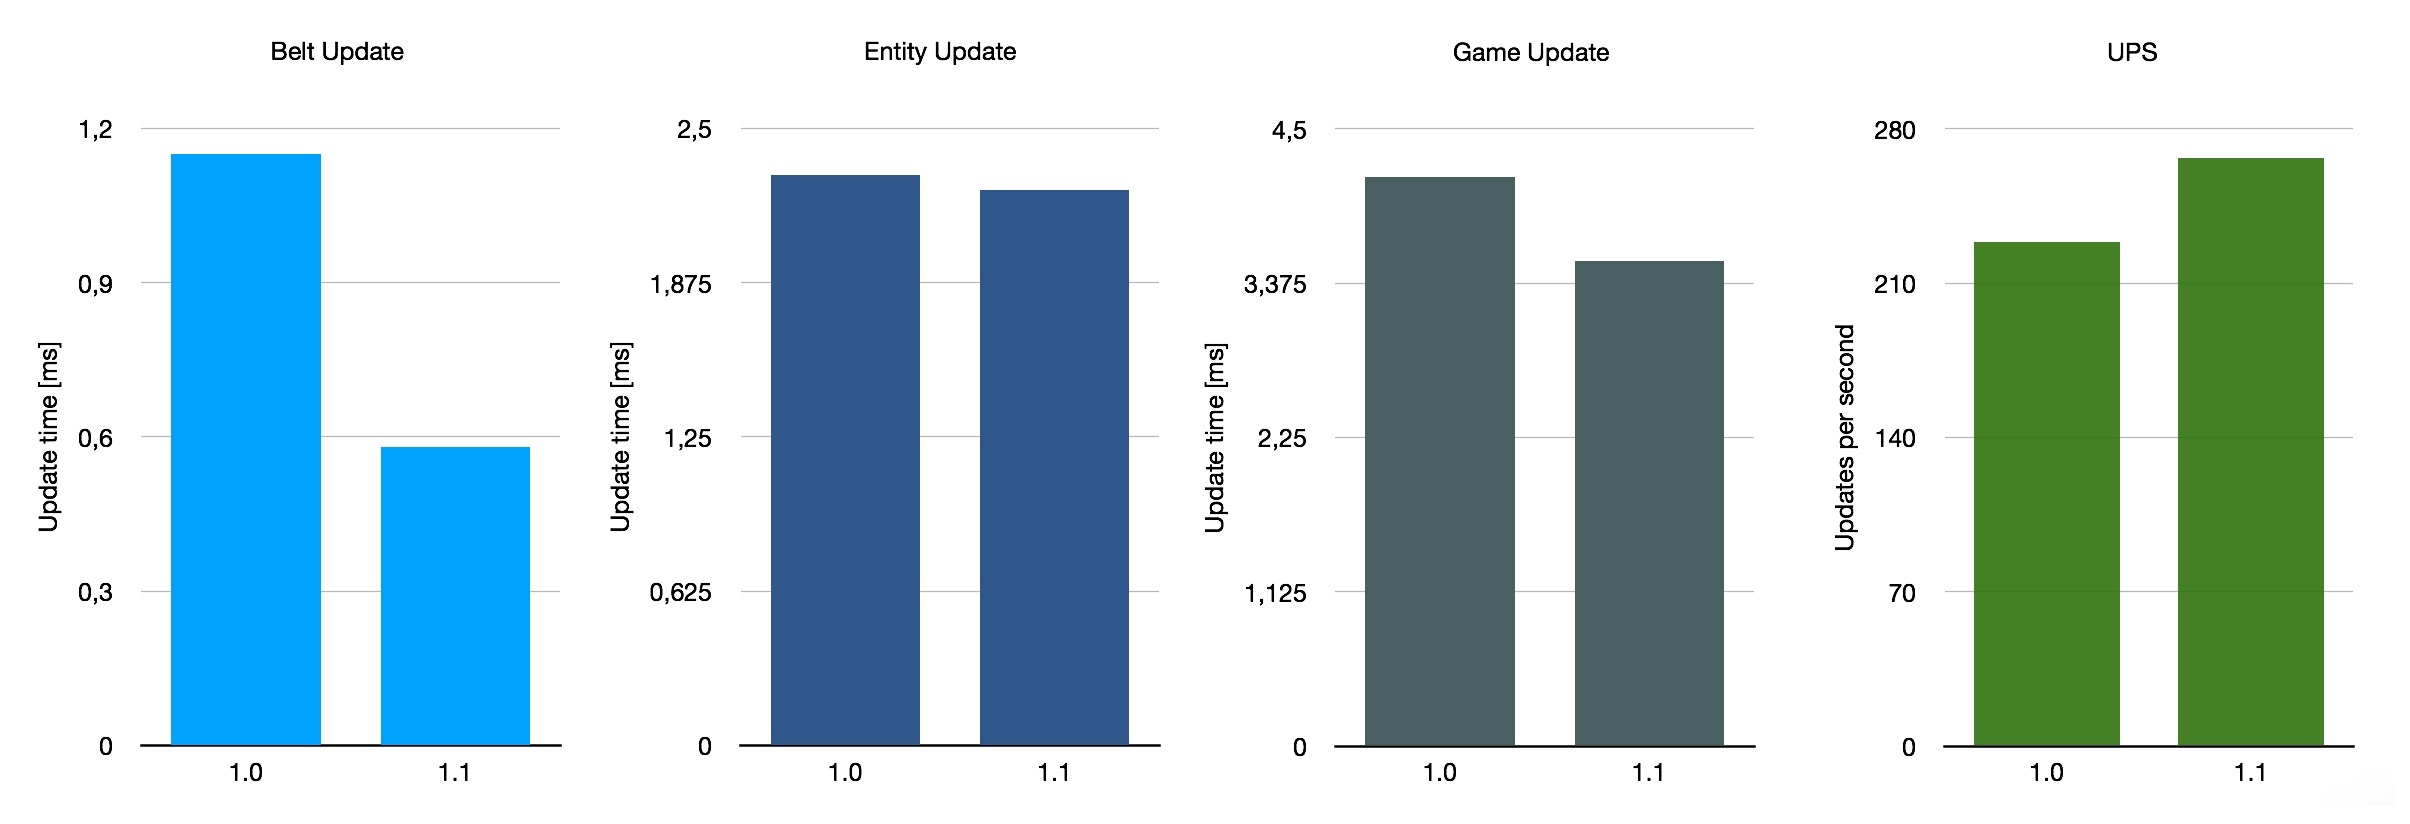
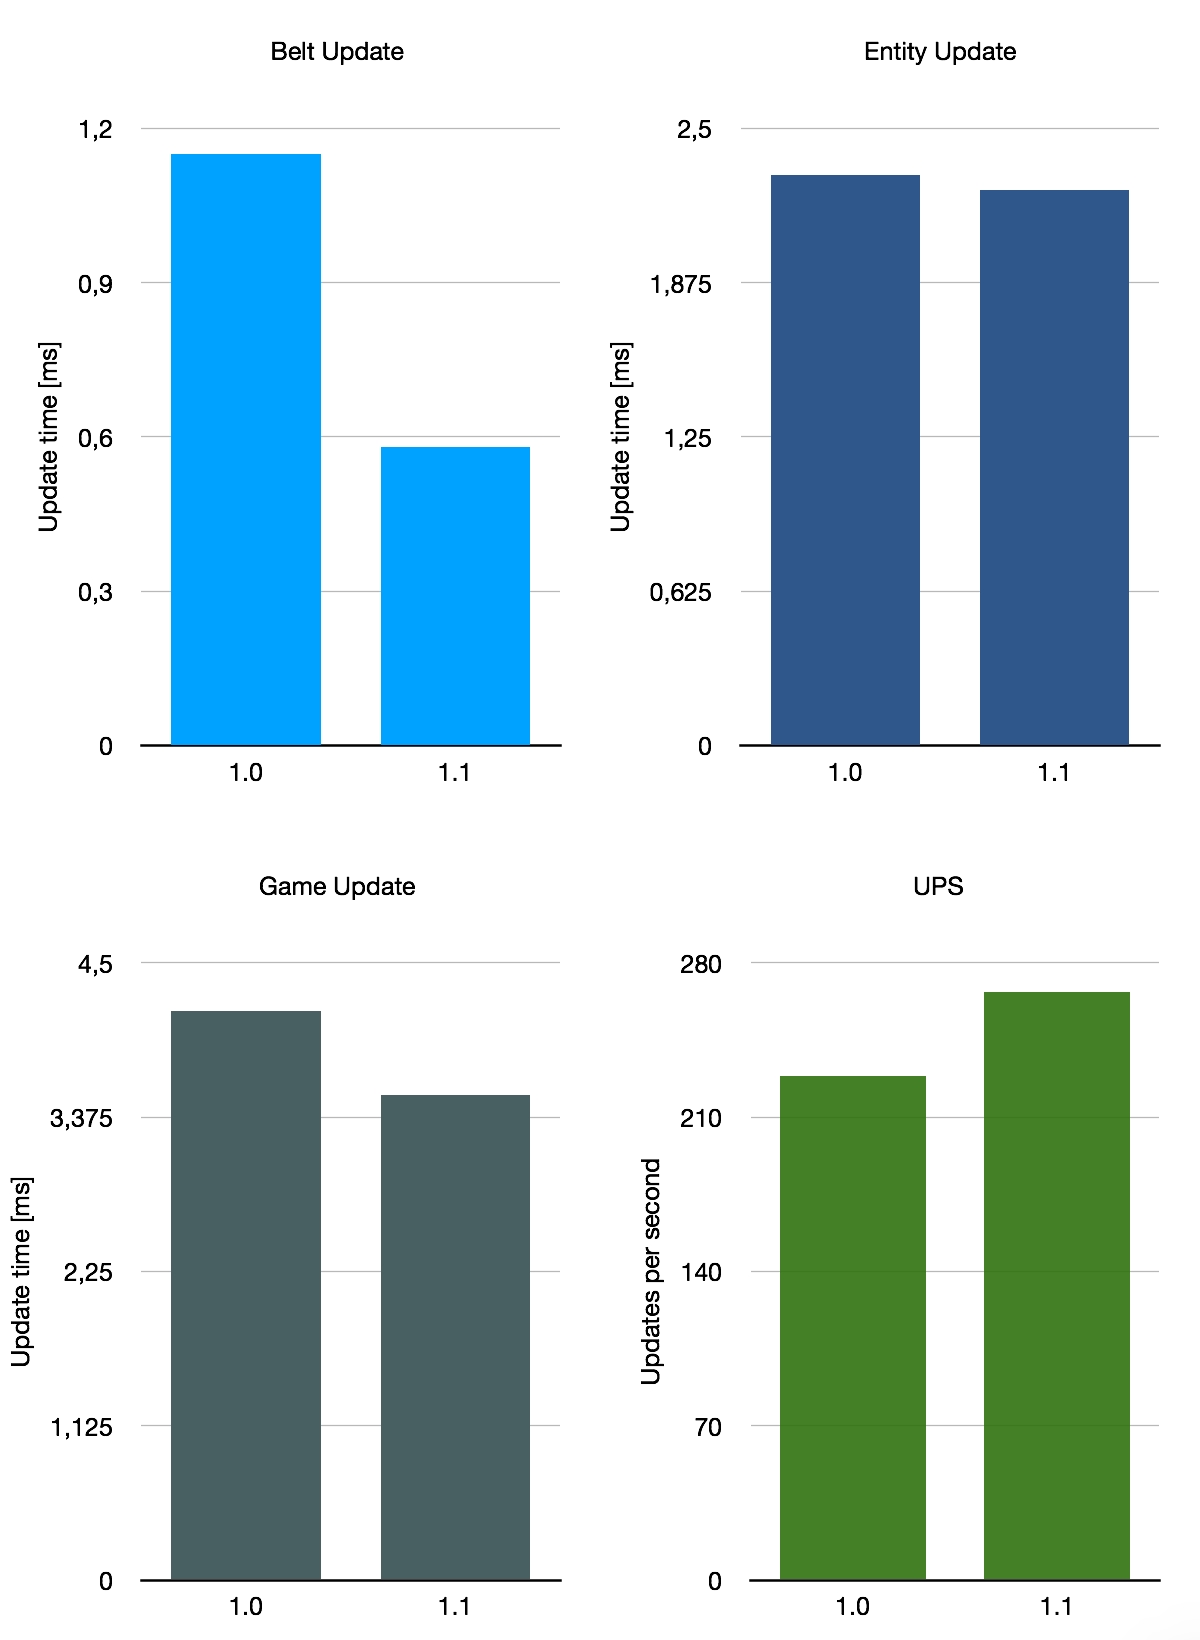
Then, I tested a base whose layout is closer to what you or I might construct. It’s just called cam6 on FactorioBox, with no indication as to its origin. It relies mostly on belts, with some trains and bots mixed in. It also produces power using nuclear reactors, which tend to slice off a non-negligeable piece of the performance cake. Like I said, it has all the things you would expect from a common Factorio map, which makes it a good representation of the impact you can expect on your factory.
Lastly, I took a look at a somewhat unusual candidate: a gigantic, messy map titled Besenovsky Pajzel, which presumably is the name of its creator. It’s described as a “huge map (13300x7400 tiles) with inefficient production ranged from 2.4 up to 4k SPM.” So this map uses a mix of all the things, with the most significant difference to the previous two being the extensive use of trains. What we expect from this is that the impact of the optimisations in 1.1 is smaller as the thing that has been improved is less relevant on this map.
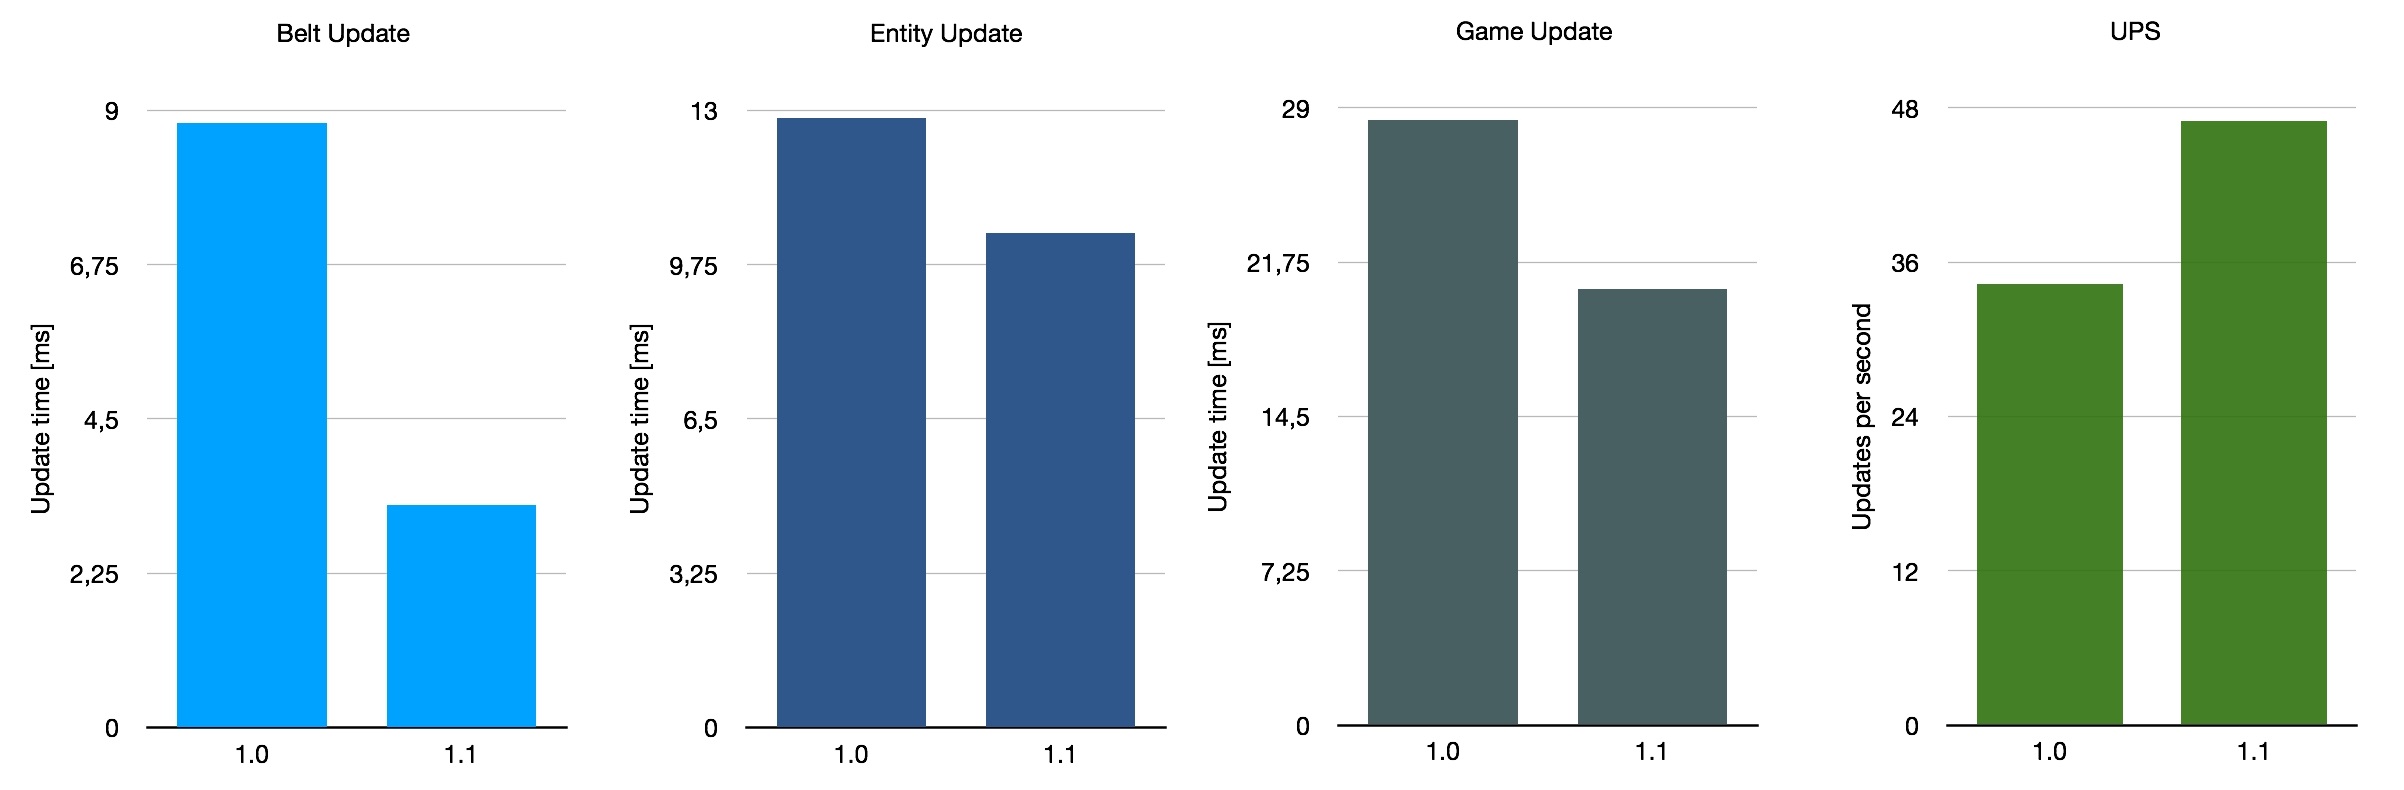
If we average these three very rough benchmarks, we get an average belt performance improvement of 140%, with UPS going up by 26% on average. This is not representative of the average of all saves in use of course, as we only considered these three special maps. All in all, the improvement with 1.1 depends somewhat on your base layout, but it’s a nice overall improvement.
After all, it doesn’t really matter if a particular performance improvement has a large effect; it’s the sum of all the small improvements that lead to the game running an order of magnitude quicker. We explored this effect a couple of weeks ago in Alt-F4 #13, and I expect that base to get an additional uptick in performance.
Contributing
As always, we’re looking for people that want to contribute to Alt-F4, be it by submitting an article or by helping with translation. If you have something interesting in mind that you want to share with the community in a polished way, this is the place to do it. If you’re not too sure about it we’ll gladly help by discussing content ideas and structure questions. If that sounds like something that’s up your alley, join the Discord to get started!